Getting Started with Arduino and Ultrasonic Sensors: An Easy Guide to Calculating Distance with Code

Getting Started with Arduino and Ultrasonic Sensors: An Easy Guide to Calculating Distance with Code:
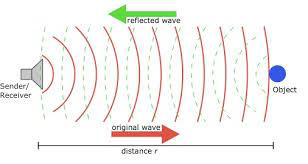
The HC-SR04 ultrasonic sensor uses SONAR to determine the distance of an object just like the bats do.
It offers excellent non-contact range detection with high accuracy and stable readings in an easy-to-use package from 2 cm to 400 cm or 1” to 13 feet.
The operation is not affected by sunlight or black material, although acoustically, soft materials like cloth can be difficult to detect. It comes complete with ultrasonic transmitter and receiver module.

Technical Specifications
- Power Supply − +5V DC
- Quiescent Current − <2mA
- Working Current − 15mA
- Effectual Angle − <15°
- Ranging Distance − 2cm – 400 cm/1″ – 13ft
- Resolution − 0.3 cm
- Measuring Angle − 30 degree
Components Required
You will need the following components −
- 1 × Breadboard
- 1 × Arduino Uno R3
- 1 × ULTRASONIC Sensor (HC-SR04)
Procedure
Follow the circuit diagram and make the connections as shown in the image given below.

Sketch
Open the Arduino IDE software on your computer. Coding in the Arduino language will control your circuit. Open a new sketch File by clicking New.
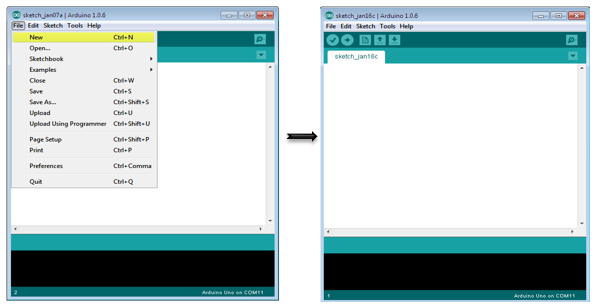
Getting Started with Arduino and Ultrasonic Sensors: An Easy Guide to Calculating Distance with Code
Arduino Code
const int pingPin = 7; // Trigger Pin of Ultrasonic Sensor
const int echoPin = 6; // Echo Pin of Ultrasonic Sensor

void setup() {
   Serial.begin(9600); // Starting Serial Terminal
}

void loop() {
   long duration, inches, cm;
   pinMode(pingPin, OUTPUT);
   digitalWrite(pingPin, LOW);
   delayMicroseconds(2);
   digitalWrite(pingPin, HIGH);
   delayMicroseconds(10);
   digitalWrite(pingPin, LOW);
   pinMode(echoPin, INPUT);
   duration = pulseIn(echoPin, HIGH);
   inches = microsecondsToInches(duration);
   cm = microsecondsToCentimeters(duration);
   Serial.print(inches);
   Serial.print("in, ");
   Serial.print(cm);
   Serial.print("cm");
   Serial.println();
   delay(100);
}

long microsecondsToInches(long microseconds) {
   return microseconds / 74 / 2;
}

long microsecondsToCentimeters(long microseconds) {
   return microseconds / 29 / 2;
}
Code to Note
The Ultrasonic sensor has four terminals - +5V, Trigger, Echo, and GND connected as follows −
- Connect the +5V pin to +5v on your Arduino board.
- Connect Trigger to digital pin 7 on your Arduino board.
- Connect Echo to digital pin 6 on your Arduino board.
- Connect GND with GND on Arduino.
In our program, we have displayed the distance measured by the sensor in inches and cm via the serial port.
Comments
Post a Comment